Difference between revisions of "Installing/Winky"
(Created page with "...") |
(→Install GalliumOS) |
||
| (12 intermediate revisions by 2 users not shown) | |||
| Line 1: | Line 1: | ||
| − | ... | + | == Notes: == |
| + | This is a guide to installing GalliumOS on the Baytrail version of the Samsung Chromebook 2, codename "Winky". Model# XE500C12-K01US. | ||
| + | |||
| + | This was originally published here: https://sites.google.com/site/winkychromebook/ | ||
| + | |||
| + | |||
| + | Note: This procedure does not let you dual-boot ChromeOS and GalliumOS. At the time this was originally written, it was not possible. It technically is possible now, with a different BIOS and using chrx. I don't recommend it, because Winky has only 16GB of space, and you wont have much space left with both installed. | ||
| + | |||
| + | Please read all steps before starting. | ||
| + | |||
| + | == Enter developer mode. == | ||
| + | Be sure to redeem any offers google gives you (like free movies, or 100GB of Google Drive space, etc.) before starting this process. | ||
| + | |||
| + | Back up all your files in your Download folder. | ||
| + | |||
| + | Make sure everything is backed up!!! | ||
| + | |||
| + | Turn off the Chromebook. | ||
| + | |||
| + | Hold <code>[ESC]</code> and the <code>"Refresh"</code> key at the same time, then turn on the computer. | ||
| + | |||
| + | Press <code>[CTRL]</code> + <code>[D]</code> at the same time. | ||
| + | |||
| + | This will wipe the computer and install the developer version of ChromeOS. | ||
| + | |||
| + | Play the waiting game. | ||
| + | |||
| + | Log in. | ||
| + | |||
| + | == Open the bottom and remove the Write Protect screw. == | ||
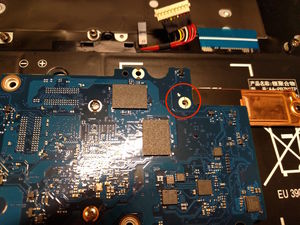
| + | There are 2 known locations for the WP screw on WINKY. | ||
| + | |||
| + | === Location 1: (Underside of Motherboard) === | ||
| + | Turn off the Chromebook. | ||
| + | |||
| + | Remove all the screws on the bottom of the Chromebook. (All the screws are visible - no hidden screws) | ||
| + | |||
| + | The best place to start prying open is the SD Card slot. Remove any installed card first though. | ||
| + | |||
| + | Once the bottom is removed, you should see: | ||
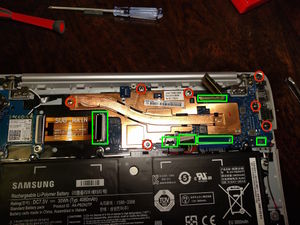
| + | [[File:WINKY WP 1.jpg|none|thumb|Step 1: Screws to remove in red, cables to undo in green. Keep track of which screws go where.]] | ||
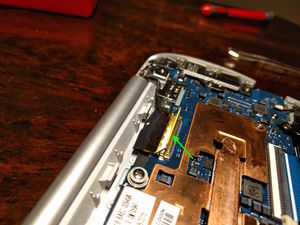
| + | [[File:WINKY WP 2.jpg|none|thumb|Step 2: The display cable has a little yellow lever thing. Just pry it up and use it to pull backward to release it from the motherboard.]] | ||
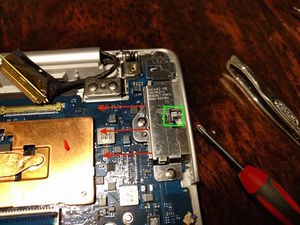
| + | [[File:WINKY WP 3.jpg|none|thumb|Step 3: This little metal support bracket has a tab on it that requires you to slide it backward to release fully after taking the 3 screws out.]] | ||
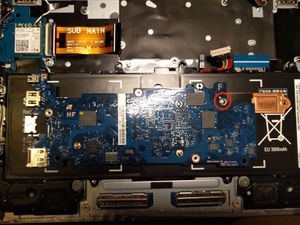
| + | [[File:WINKY WP 4.jpg|none|thumb|Step 4: Here is the write protect screw to remove. It is the conspicuous one with the grey wire mesh under it.]] | ||
| + | [[File:WINKY WP 5.jpg|none|thumb|Step 5: Here is the screw and mesh removed.]] | ||
| + | |||
| + | Assemble everything back together. | ||
| + | |||
| + | === Location 2: (Topside of Motherboard) === | ||
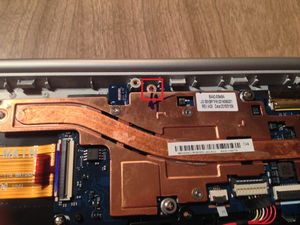
| + | Some models of WINKY have a different location for the WP screw, which is much easier to access. | ||
| + | [[File:WINKY WP ALT 1.jpg|none|thumb|Alternate Location of the WP screw. ]] | ||
| + | Unlike Location 1, you do not need to remove the motherboard or any connectors. | ||
| + | |||
| + | '''Note:''' If yours is different from these two locations, look for a screw with mesh between the head and the motherboard. Let us know as well. | ||
| + | |||
| + | Remove the screw, then put the cover back on the Chromebook. | ||
| + | |||
| + | == Prepare USB Drive. == | ||
| + | Go to https://galliumos.org/download. You want the Bay Trail version. At the time this was written, it is: <code>galliumos-baytrail-3.1.iso</code> | ||
| + | |||
| + | Follow the directions here: [[Installing/Creating_Bootable_USB]] to "burn" the ISO to a USB drive. | ||
| + | |||
| + | == Flash the coreboot/UEFI Firmware == | ||
| + | WARNING: Once the UEFI firmware is flashed, you cannot boot into ChromeOS anymore. You will need a (UEFI) bootable USB drive to install a new operating system. | ||
| + | |||
| + | We will install the Modified BIOS by MrChromebox. | ||
| + | |||
| + | Turn on the Chromebook and log in, if needed. | ||
| + | |||
| + | Make sure all files are backed up, just in case. | ||
| + | |||
| + | Press <code>[Ctrl]</code>+<code>[Alt]</code>+<code>[t]</code> to open a terminal. | ||
| + | |||
| + | Type in <code>shell</code> and press [Enter]. | ||
| + | |||
| + | Copy/Paste the command(s) from MrChromebox's site [https://mrchromebox.tech/#fwscript https://mrchromebox.tech/#fwscript] to download/run the Firmware Utility Script. | ||
| + | |||
| + | Select the menu option to install the UEFI Firmware. | ||
| + | |||
| + | If successful, select the menu option to power off the Chromebook. Insert GalliumOS install media, power on, boot media, and install the OS. | ||
| + | |||
| + | == Install GalliumOS == | ||
| + | Insert your USB drive you "burned" earlier. | ||
| + | |||
| + | It is recommended to plug the AC power adapter in, but not required unless the battery is low. | ||
| + | |||
| + | Turn ON the Chromebook | ||
| + | |||
| + | The LiveCD/installer should boot. | ||
| + | |||
| + | Follow the prompts to install GalliumOS. | ||
| + | |||
| + | Install to "/dev/mmcblk0" when choosing the install location. | ||
| + | |||
| + | Reboot when successful. Remove the USB drive when asked. | ||
| + | |||
| + | ==== Update GalliumOS Packages ==== | ||
| + | In terminal update the packages by executing the following commands: | ||
| + | |||
| + | <code>sudo apt-get update</code> | ||
| + | |||
| + | <code>sudo apt-get dist-upgrade</code> | ||
Latest revision as of 22:30, 10 October 2020
Contents
Notes:
This is a guide to installing GalliumOS on the Baytrail version of the Samsung Chromebook 2, codename "Winky". Model# XE500C12-K01US.
This was originally published here: https://sites.google.com/site/winkychromebook/
Note: This procedure does not let you dual-boot ChromeOS and GalliumOS. At the time this was originally written, it was not possible. It technically is possible now, with a different BIOS and using chrx. I don't recommend it, because Winky has only 16GB of space, and you wont have much space left with both installed.
Please read all steps before starting.
Enter developer mode.
Be sure to redeem any offers google gives you (like free movies, or 100GB of Google Drive space, etc.) before starting this process.
Back up all your files in your Download folder.
Make sure everything is backed up!!!
Turn off the Chromebook.
Hold [ESC] and the "Refresh" key at the same time, then turn on the computer.
Press [CTRL] + [D] at the same time.
This will wipe the computer and install the developer version of ChromeOS.
Play the waiting game.
Log in.
Open the bottom and remove the Write Protect screw.
There are 2 known locations for the WP screw on WINKY.
Location 1: (Underside of Motherboard)
Turn off the Chromebook.
Remove all the screws on the bottom of the Chromebook. (All the screws are visible - no hidden screws)
The best place to start prying open is the SD Card slot. Remove any installed card first though.
Once the bottom is removed, you should see:
Assemble everything back together.
Location 2: (Topside of Motherboard)
Some models of WINKY have a different location for the WP screw, which is much easier to access.
Unlike Location 1, you do not need to remove the motherboard or any connectors.
Note: If yours is different from these two locations, look for a screw with mesh between the head and the motherboard. Let us know as well.
Remove the screw, then put the cover back on the Chromebook.
Prepare USB Drive.
Go to https://galliumos.org/download. You want the Bay Trail version. At the time this was written, it is: galliumos-baytrail-3.1.iso
Follow the directions here: Installing/Creating_Bootable_USB to "burn" the ISO to a USB drive.
Flash the coreboot/UEFI Firmware
WARNING: Once the UEFI firmware is flashed, you cannot boot into ChromeOS anymore. You will need a (UEFI) bootable USB drive to install a new operating system.
We will install the Modified BIOS by MrChromebox.
Turn on the Chromebook and log in, if needed.
Make sure all files are backed up, just in case.
Press [Ctrl]+[Alt]+[t] to open a terminal.
Type in shell and press [Enter].
Copy/Paste the command(s) from MrChromebox's site https://mrchromebox.tech/#fwscript to download/run the Firmware Utility Script.
Select the menu option to install the UEFI Firmware.
If successful, select the menu option to power off the Chromebook. Insert GalliumOS install media, power on, boot media, and install the OS.
Install GalliumOS
Insert your USB drive you "burned" earlier.
It is recommended to plug the AC power adapter in, but not required unless the battery is low.
Turn ON the Chromebook
The LiveCD/installer should boot.
Follow the prompts to install GalliumOS.
Install to "/dev/mmcblk0" when choosing the install location.
Reboot when successful. Remove the USB drive when asked.
Update GalliumOS Packages
In terminal update the packages by executing the following commands:
sudo apt-get update
sudo apt-get dist-upgrade
